Spring Security - HTTP API 기반의 인증 아키텍처
Spring Security - HTTP API 기반의 인증 아키텍처
동작하는 전체 코드는 🕋 깃허브 저장소를 참고해주세요.
DelegatingFilterProxy 는 표준 서블릿 필터를 구현하고 있고, 내부에 FilterChainProxy라는 이름의 위임 대상을 갖습니다.

Spring Security를 프로젝트에 적용하면 FilterChainProxy 을 통해 SpringFilterChain을 구현하여 동작합니다.
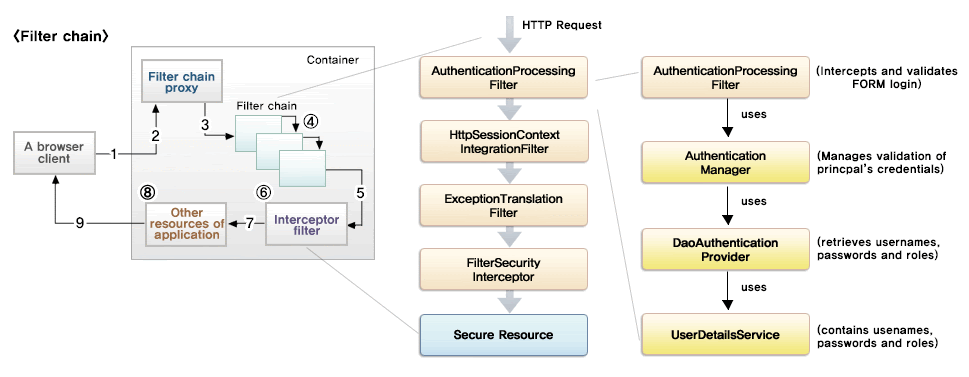
SpringFilterChain에는 정말 많은 수의 필터가 이미 구현돼있고, 얼마든지 더 확장할 수 있는 구조로 만들어져 있습니다.
이 글에서는 서버사이드 렌더링(SSR)을 하지 않는 상황을 가정하고 HTTP API 방식으로 이메일&비밀번호 인증을 구현하는 방법을 다룹니다.
이 경우 인증 요청 컨텐츠로 이메일과 비밀번호가 JSON으로 들어오기 때문에 내부적인 처리 로직은 사실 기존 폼로그인 방식과 크게 다를 게 없지만 예외 처리나 응답 등에서 아주 약간의 차이가 있을 수 있습니다. (특히 응답)
우선 전체적인 흐름은 다음과 같습니다.
- 클라이언트가 서버로 로그인을 시도합니다
- 클라이언트 애플리케이션이 이메일과 비밀번호를 입력받아 서버에 인증 요청을 보내옵니다
- 서버는 이메일과 비밀번호를 받아 내부적으로 인증처리를 진행하고 클라이언트에 적절한 응답을 반환합니다
이때 응답은 처리 결과에 따라 Http Status로 구분하고 응답 바디에 JSON 문자열을 담아줍니다.
우선 기존에 인증을 처리하는 주체인 AuthenticationProvider를 확장하여 커스터마이징합니다. 이름은 CustomAuthenticationProvider로 명명하였습니다.
그리고 CustomAuthenticationProvider는 UserDetailsService를 확장한 CustomUserDetailsService를 의존합니다.
CustomUserDetailsService는 CustomAuthenticationProvider의 메시지를 받아 데이터베이스에서 인증 주체의 정보를 가져오는 책임을 갖습니다.
@Service
@RequiredArgsConstructor
public class CustomUserDetailsService implements UserDetailsService {
    private final UserRepository userRepository;

    @Override
    public UserDetails loadUserByUsername(String email) throws UsernameNotFoundException {
        try {
            return userRepository.findBy(email);
        } catch (NoSuchElementException e) {
            throw new UsernameNotFoundException("email not found");
        }
    }
}
CustomAuthenticationProvider는 유저의 인증처리를 하고 판별하는 책임을 갖습니다.
필터를 통해 AuthenticationManager가 미인증 상태의 Authentication을 생성하여 AuthenticationProvider.authenticate로 넘기며 이곳에 넘어온 Authentication은 사용자가 서버에 인증을 요청하기 위해 전달한 정보를 담고 있습니다. 이 정보는 이전에 요청을 받은 필터의 전처리에 따라 달라질수도 있습니다.
예를 들어 AuthenticationProvider에 인증 요청을 위임한 필터가 UsernamePasswordAuthenticationFilter라면 AuthenticationProvider.authenticate로 넘어오는 파라미터는 아이디, 이메일과 비밀번호 같은 것들이 될 수 있습니다.
참고로
Authentication은 스프링 시큐리티에서 사용하는 모든 인증 토큰을 규격화한 인터페이스로 스프링 시큐리티에서 아주 핵심적인 책임을 갖습니다.
@RequiredArgsConstructor
public final class CustomAuthenticationProvider implements AuthenticationProvider {
    private final PasswordEncoder passwordEncoder;
    private final UserDetailsService userDetailsService;

    @Override
    public Authentication authenticate(Authentication authentication) throws AuthenticationException {
        // 데이터베이스에서 유저의 정보를 조회합니다
        // 만약 데이터베이스에 유저의 정보가 없다면 UsernameNotFoundException가 던져지고 인증 핸들러로 처리가 위임됩니다
        UserDetails user = userDetailsService.loadUserByUsername(authentication.getName());

        // 데이터베이스에서 조회한 유저의 정보에서 비밀번호를 조회합니다
        // 이 비밀번호는 암호화된 상태입니다
        String dbPassword = user.getPassword();

        // 사용자가 입력한 비밀번호를 문자열로 캐스팅합니다
        String enteredPassword = (String) authentication.getCredentials();

        // 사용자가 입력한 비밀번호를 암호화하여 데이터베이스에서 조회한 비밀번호와 매치시켜봅니다
        // 만약 올바른 비밀번호를 입력했다면, 암호화된 비밀번호는 데이터베이스의 비밀번호와 일치할 것입니다
        // 일치하지 않는다면 BadCredentialsException를 던지고 역시 인증 핸들러로 처리가 위임됩니다
        if (!passwordEncoder.matches(enteredPassword, dbPassword)) {
            throw new BadCredentialsException("password not matched.");
        }

        // 여기까지 도달했다면 사용자가 올바른 이메일과 비밀번호를 입력한것입니다
        // 이제 인증에 성공했다는 토큰을 발급해야 합니다
        // 사용자의 요청이 HTTP API를 통해 들어왔는지 판별하고 맞다면 HttpAuthenticationToken를 발급합니다
        // 이 때 인증 토큰에 비밀번호가 들어있으면 보안상 좋지 않으므로 비밀번호는 null로 치환합니다
        if (isHttpAuthenticationToken(authentication.getClass())) {
            return HttpAuthenticationToken.authenticated(
                    /*principal*/ user.getUsername(),
                    /*credentials*/ null, user.getAuthorities()
            );
        }

        // 사용자의 요청이 폼 로그인방식을 통해 들어왔다면 UsernamePasswordAuthenticationToken를 발급합니다
        // 이 때 인증 토큰에 비밀번호가 들어있으면 보안상 좋지 않으므로 비밀번호는 null로 치환합니다
        return UsernamePasswordAuthenticationToken.authenticated(
                /*principal*/ user.getUsername(),
                /*credentials*/ null,
                /*authorities*/ user.getAuthorities()
        );
    }

    // 인증처리자(AuthenticationProvider)가 어떤 종류의 토큰에 대한 처리를 지원할 것인지에 대한 여부를 재정의해야합니다
    // 사실 폼 로그인 방식과 HTTP API 방식의 인증 처리는 큰 차이가 없기 때문에 이 예제에서는 인증처리자가 두 방식을 모두 지원하도록 하였습니다
    @Override
    public boolean supports(Class<?> authentication) {
        return isFormLoginAuthenticationToken(authentication) || isHttpAuthenticationToken(authentication);
    }

    private boolean isHttpAuthenticationToken(Class<?> authentication) {
        return HttpAuthenticationToken.class.isAssignableFrom(authentication);
    }

    private boolean isFormLoginAuthenticationToken(Class<?> authentication) {
        return UsernamePasswordAuthenticationToken.class.isAssignableFrom(authentication);
    }
}
HttpAuthenticationToken은 HTTP API 방식의 처리에서 사용 될 토큰으로, AbstractAuthenticationToken을 상속하여 확장하였습니다.
참고로 여기서
AbstractAuthenticationToken은Authentication을 일부 구현한 추상 클래스입니다.
HTTP API 방식의 인증 요청이 들어올 경우 해당 요청을 처리하는 필터에서 요청을 받아 이 토큰을 생성하고, AuthenticationProvider에 처리를 위임합니다.
이 때 AuthenticationProvider를 구현한 여러 콘크리트 클래스 중 CustomAuthenticationProvider.supports가 HTTPAuthenticationToken.class를 지원하고 있음을 명시하고 있으니 HTTP API 방식의 인증처리는 CustomAuthenticationProvider를 통해 진행되게 됩니다.
public class HttpAuthenticationToken extends AbstractAuthenticationToken {
    @Serial
    private static final long serialVersionUID = SpringSecurityCoreVersion.SERIAL_VERSION_UID;
    private final Object principal;
    private Object credentials;

    private HttpAuthenticationToken(Object principal, Object credentials) {
        super(null);
        this.principal = principal;
        this.credentials = credentials;
        setAuthenticated(false);
    }

    public static HttpAuthenticationToken unauthenticated(Object principal, Object credentials) {
        return new HttpAuthenticationToken(principal, credentials);
    }

    private HttpAuthenticationToken(Object principal, Object credentials, Collection<? extends GrantedAuthority> authorities) {
        super(authorities);
        this.principal = principal;
        this.credentials = credentials;
        super.setAuthenticated(true);
    }

    public static HttpAuthenticationToken authenticated(Object principal, Object credentials, Collection<? extends GrantedAuthority> authorities) {
        return new HttpAuthenticationToken(principal, credentials, authorities);
    }

    @Override
    public Object getCredentials() {
        return this.credentials;
    }

    @Override
    public Object getPrincipal() {
        return this.principal;
    }

    @Override
    public void setAuthenticated(boolean isAuthenticated) throws IllegalArgumentException {
        Assert.isTrue(!isAuthenticated, "can't set this token to trusted - use constructor which takes a GrantedAuthority list instead");
        super.setAuthenticated(false);
    }

    @Override
    public void eraseCredentials() {
        super.eraseCredentials();
        this.credentials = null;
    }
}
이제 HTTP API 기반의 인증처리를 담당 할 HttpLoginFilter를 작성합니다.
public class HttpLoginFilter extends AbstractAuthenticationProcessingFilter {
    private final ObjectMapper objectMapper;

    // "/api/v1/login"로 요청이 들어 올 경우 이 필터가 동작합니다
    public HttpLoginFilter(ObjectMapper objectMapper) {
        super(new AntPathRequestMatcher(
                /*default path to verify*/ "/api/v1/login"));
        this.objectMapper = objectMapper;
    }

    @Override
    public Authentication attemptAuthentication(HttpServletRequest request, HttpServletResponse response) throws AuthenticationException, IOException, ServletException {
        // 들어온 요청이 위의 URI는 맞지만 넘어온 파라미터가 HTTP API 기반의 요청이 아닐 경우 예외를 던집니다
        if (!isApplicationJson(request)) {
            throw new IllegalStateException("request content format is not application/json");
        }

        // HTTP API 기반의 인증 요청이 맞다면 요청 데이터를 LoginRequest에 바인딩합니다
        LoginRequest body = objectMapper.readValue(request.getReader(), LoginRequest.class);

        // 만약 이메일이나 비밀번호 데이터가 실제로 있지는 않다면 (필드는 있는 상태) 예외를 던집니다
        if (body.isEmptyContents()) {
            throw new IllegalStateException("no email or password entered.");
        }

        // AuthenticationProvider에 미인증 상태의 토큰을 생성해 넘겨야 하므로 HTTPAuthenticationToken의 생성자를 호출합니다
        HttpAuthenticationToken token = HttpAuthenticationToken.unauthenticated(body.getEmail(), body.getPassword());
        return getAuthenticationManager().authenticate(token);
    }

    private boolean isApplicationJson(HttpServletRequest request) {
        return APPLICATION_JSON_VALUE.equals(request.getContentType());
    }
}
여기서 위의 LoginRequest 코드는 다음과 같습니다.
@Getter
@NoArgsConstructor(access = PRIVATE)
public class LoginRequest {
    @Email
    @NotNull(message = "please enter your email.")
    private String email;

    @NotNull(message = "please enter your password.")
    @Pattern(
            regexp = "^[a-zA-Z0-9!@#$%^&*]{12,32}$",
            message = "The password must be 12 to 32 characters, combining alphanumeric special characters without spaces."
    )
    private String password;

    public LoginRequest(String email, String password) {
        this.email = email;
        this.password = password;
    }

    public boolean isEmptyContents() {
        return email == null || email.isBlank() ||
                password == null || password.isBlank();
    }
}
여기까지 HTTP API 인증 처리에 대한 모든 코드 작성이 끝났습니다. 이제 인증 요청 성공, 인증 요청 실패에 대한 처리를 담당하는 핸들러를 작성해야 합니다.
우선 인증 성공시 이후의 처리를 책임질 핸들러입니다.
현재 코드에서는 딱히 하는게 없습니다. 세션-쿠키방식이나 JWT를 쓴다던가 한다면 이곳에서 별도의 설정을 더 해주면 되겠습니다.
@RequiredArgsConstructor
public class CustomAuthenticationSuccessHandler implements AuthenticationSuccessHandler {
    private final ObjectMapper objectMapper;

    @Override
    public void onAuthenticationSuccess(HttpServletRequest request, HttpServletResponse response, Authentication authentication) throws IOException {
        response.setCharacterEncoding("UTF-8");
        response.setStatus(OK.value());
        response.setContentType(APPLICATION_JSON_VALUE);

        HttpResponse<String> httpResponse = new HttpResponse<>(OK, "logged in");
        objectMapper.writeValue(response.getWriter(), httpResponse);
    }
}
인증 실패시 처리를 책임질 핸들러입니다.
여기로는 Spring Security가 던진 예외가 넘어오는데, 예외를 체크하여 별도의 처리를 분기시켜주면 됩니다.
@RequiredArgsConstructor
public class CustomAuthenticationFailureHandler implements AuthenticationFailureHandler {
    private final ObjectMapper objectMapper;

    @Override
    public void onAuthenticationFailure(HttpServletRequest request, HttpServletResponse response, AuthenticationException exception) throws IOException {
        response.setCharacterEncoding("UTF-8");
        response.setStatus(UNAUTHORIZED.value());
        response.setContentType(APPLICATION_JSON_VALUE);

        String message = "email or password is invalid.";

        if (exception instanceof BadCredentialsException) {
            message = "email or password is invalid.";
        }

        HttpResponse<String> httpResponse = new HttpResponse<>(UNAUTHORIZED, message);
        objectMapper.writeValue(response.getWriter(), httpResponse);
    }
}
마지막으로 위에 작성한 모든 인증 컴포넌트들을 모아 SpringFilterChain bean을 작성합니다.
이 예제에서는 Spring Security 6+을 사용하고 있기 때문에 별도로 SpringFilterChain을 만들지만, 이보다 낮은 버전에서는 WebSecurityConfigurerAdapter를 상속하고 @EnableWebSecurity를 선언하는 방식으로 구현될 것입니다.
@Configuration
@RequiredArgsConstructor
public class SecurityConfiguration {
    @Bean
    public SecurityFilterChain filterChain(
            HttpSecurity http,
            UserDetailsService userDetailsService,
            AuthenticationProvider authenticationProvider,
            HttpLoginFilter httpLoginFilter
    ) throws Exception {
        http
                .httpBasic().disable()
                .csrf().disable()
                .authorizeHttpRequests(authorize -> authorize
                        .mvcMatchers(POST, "/api/v1/login").permitAll()
                        .anyRequest().authenticated())
                .authenticationProvider(authenticationProvider)
                .userDetailsService(userDetailsService)
                .addFilterBefore(httpLoginFilter, UsernamePasswordAuthenticationFilter.class);

        return http.build();
    }

    @Bean
    public PasswordEncoder passwordEncoder() {
        return PasswordEncoderFactories.createDelegatingPasswordEncoder();
    }

    @Bean
    public AuthenticationManager authenticationManager(AuthenticationConfiguration authenticationConfiguration) throws Exception {
        return authenticationConfiguration.getAuthenticationManager();
    }

    @Bean
    public AuthenticationProvider authenticationProvider(PasswordEncoder passwordEncoder, UserDetailsService userDetailsService) {
        return new CustomAuthenticationProvider(passwordEncoder, userDetailsService);
    }

    @Bean
    public UserDetailsService userDetailsService(UserRepository userRepository) {
        return new CustomUserDetailsService(userRepository);
    }

    @Bean
    public HttpLoginFilter httpLoginProcessingFilter(ObjectMapper objectMapper, AuthenticationManager authenticationManager) {
        HttpLoginFilter filter = new HttpLoginFilter(objectMapper);
        filter.setAuthenticationManager(authenticationManager);
        filter.setAuthenticationSuccessHandler(new CustomAuthenticationSuccessHandler(objectMapper));
        filter.setAuthenticationFailureHandler(new CustomAuthenticationFailureHandler(objectMapper));
        return filter;
    }
}
마지막으로 이에 대한 아주 간단한 테스트 코드를 작성합니다.
@AutoConfigureWebTestClient
@SpringBootTest(webEnvironment = RANDOM_PORT)
class LoginTests {
    WebTestClient webTestClient;

    @BeforeEach
    void setUp(WebApplicationContext context) {
        webTestClient = MockMvcWebTestClient.bindToApplicationContext(context)
                .apply(springSecurity())
                .configureClient()
                .build();
    }

    @Test
    void shouldBeSuccessfulLogin() {
        webTestClient.post()
                .uri("http://localhost:8080/api/v1/login")
                .contentType(APPLICATION_JSON)
                .bodyValue(new LoginRequest("siro@gmail.com", "aaaaaaaaaaaa@#!123456"))
                .exchange()
                .expectStatus()
                .is2xxSuccessful();
    }
}